Sunday, June 28, 2020

Sony PlayStation 5 Price, Release Date, Design, Games, Controller

Sony PlayStation 5  Price, Release Date, Design, Games, Controller
PS5 release date, design, specs and news for Sony's PlayStation 5 ...

After months of hints and small reveals, Sony’s PS5 is finally out in the public eye. The company revealed its next-gen console in a games-focused livestream the other week, highlighting some of the exclusive and mutliplatform games coming to the new machine. We also got to see the box for the first time, something Microsoft did with its Xbox Series X back in January. Between that and earlier reveals, we have a fair amount of information about the thing right now, so let’s get into a roundup of everything we know so far, as well as predictions about what we don’t. So here’s the PS5: it’s design, specs, and games, as well as predictions about the price and release date.

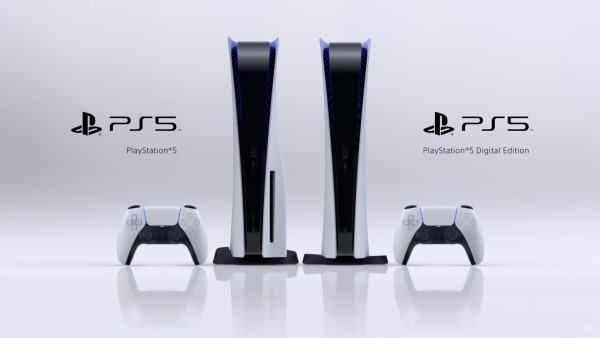
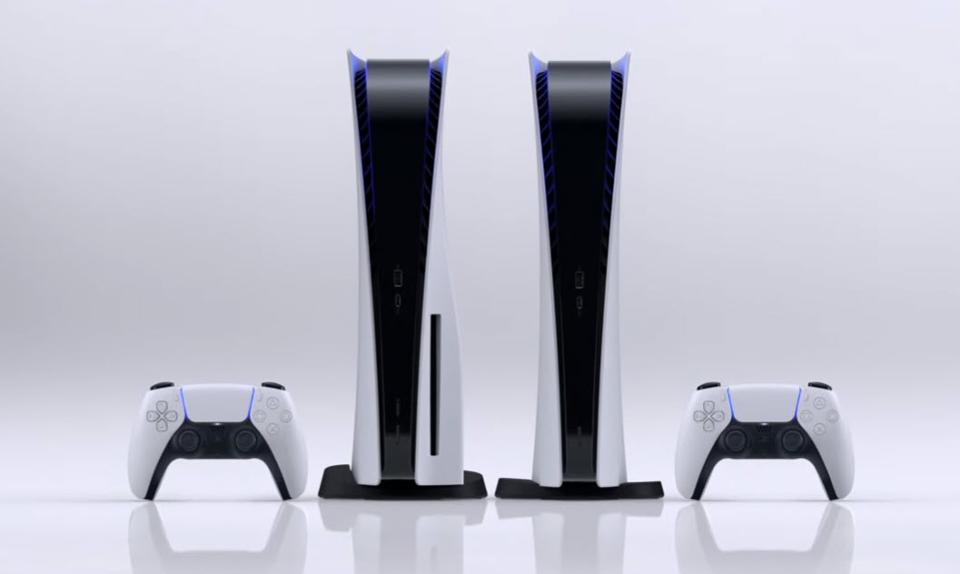
Design: It’s a weird one! Consoles have either been black boxes or made by Nintendo for as long as I can remember, but the PS4 is going for a sort of mod spaceship look, with big white plastic fins on the side. There are two versions: one with a disc drive bumping out, and one without. Both are gigantic, and likely the biggest console you’ve ever owned.

Take a look here:

Release Date: A question mark, though not quite such a big question mark as price. Consoles typically come out in November as prep for the holiday season: the PS4 came out on November 15, and the PS3 came out on November 17 (in North America). Before that, things were not quite as standardized, but nobody really expects things to change all that much. Look for something in late November, maybe 19 or 20.

Specs: Sony revealed the specs for the console before it showed the machine itself, so we know what’s inside the box:

  • CPU: AMD Zen 2-based CPU with 8 cores at 3.5GHz (variable frequency)
  • GPU: 10.28 TFLOPs, 36 CUs at 2.23GHz (variable frequency)
  • GPU architecture: Custom RDNA 2
  • Memory interface: 16GB GDDR6 / 256-bit
  • Memory bandwidth: 448GB/s
  • Internal storage: Custom 825GB SSD
  • IO throughput: 5.5GB/s (raw), typical 8-9GB/s (compressed)
  • Expandable storage: NVMe SSD slot
  • External storage: USB HDD support (PS4 games only)
  • Optical drive: 4K UHD Blu-ray drive   

Games: This is a little confusing, because the PS5 will be backwards compatible, and there are a bunch of cross-gen games that will also receive upgrades for newer hardware. So not only will anything you have on the PS4 will run on the PS5, major AAA releases like Assassin’s Creed: Valhalla, Cyberpunk 2077 and whatever the new Call of Duty is will be made to take advantage of more horsepower.

Beyond that, Sony announced a bunch of exclusive and non-exclusive titles in its recent showcase. Here’s a list of those. We’re not getting a major first-party AAA release title, but we are getting Spider-Man: Miles Morales a smaller standalone title releasing for the holiday season. The first full-scale exclusive will be Horizon: Forbidden West, out in 2021, though we don’t know when.

Dualsense

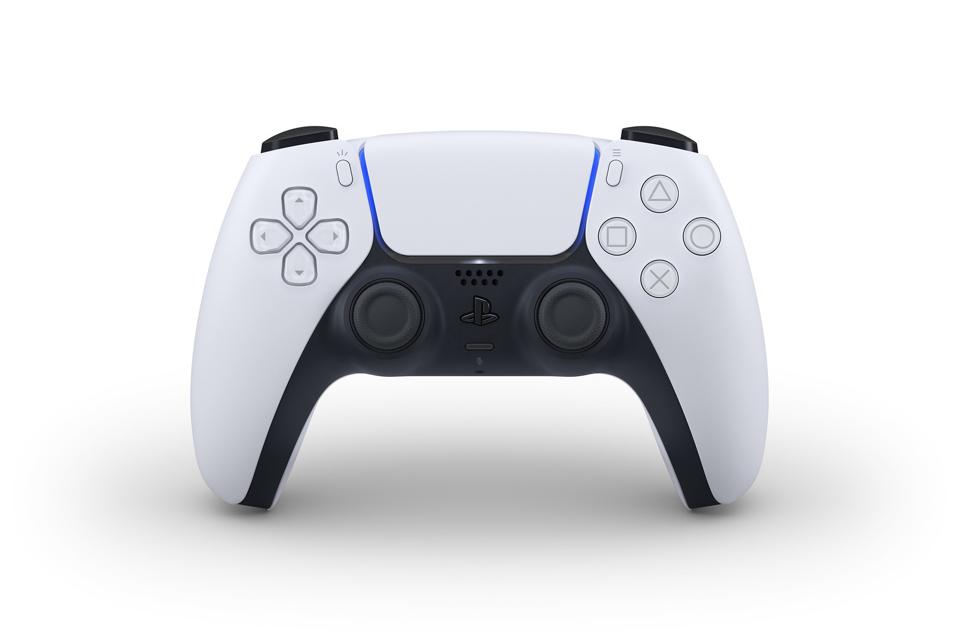
Controller: We actually saw the Dualsense controller long before the console itself, and the white/black two-tone design certainly makes more sense it context. That’s what we can see, however. What’s more exciting is what we can’t see yet: the Dualsense is coming with state of the art haptics and feedback mechanisms. I don’t want to get too excited, because it’s impossible to evaluate this stuff without a controller in its hand, and rumble effects have been overhyped before. I have, however, read impressions from developers who are impressed with the experience overall, so I’m cautiously optimistic.

Price: This one is arguably the biggest question of the entire console. We do not yet have a confirmed price, but we do have an idea of where it might fall. What we know is that there will be not one but two prices: one for the all-digital edition, and one for the disc drive edition. If the all digital edition is cheaper, most suspect a price differential of $50-$100. $100 would be a lot more than the cost of the disc drive, but there is always the possibility that Sony would be hoping to make it up through committing players to buying on PSN.

Few expect the price to go as high as $599, the eye-watering price that crippled the PS3 at launch, but it’s not totally impossible. If that’s the upper bound, the lower bound is probably $399, which is where the PS4 launched.

Most expect one of these two machines to be $499, so the breakdown could go $549/$499, or $499/$449. If we’re looking at a $50 price differential, my guess is it would be one of those two.

If we’re looking at a 365AED  price differential, it’s not impossible that we would start edging up at one of those two bounds: either $599/$499 or $499/$399.

Saturday, June 27, 2020

HOW TO GET DUBAI DRIVING LICENCE


WHO CAN GET A DRIVING LICENCE IN DUBAI

Driving License in UAE Procedure,documents and Fees Driving ...

Anyone aged 18 and above can apply for a driving licence in Dubai. People aged between 18 and 21 qualify for a probationary licence. A driving licence application should be submitted in Arabic to the RTA (Road and Traffic Authority). The authorised driving schools in Dubai will take care of that for you. Based on this application, the RTA issues a temporary licence to you, which needs to be carried at all times while you undergo the training. 

WHAT IS THE DUBAI DRIVING LICENCE PROCEDURE?

If you fall within the legal age for driving, simply follow this step-by-step Dubai driving licence guide so that you know how to proceed. The Dubai driving licence process is simple, but rigorous. Here are the processes to get your driving licence in Dubai.

  • Get your eye test done. This can be carried out at your driving school or an optician
  • Register at an RTA approved driving school in Dubai and submit all relevant documents
  • Obtain your temporary Dubai driving licence or learner’s permit and begin training
  • Complete all theory classes which can either be taken online or in the driving schools
  • Pass the theory test to move on to the practical training
  • Complete the practical classes and go for your internal assessment
  • Upon completion of the internal assessment, you need to complete highway and city road classes
  • Pass the internal parking test so that the school applies for RTA test
  • Pass the test and then the final RTA road test
  • Obtain licence

If in case you fail your first attempt, you need to obtain an additional 7 classes of training before appearing for the road test again. 

WHAT ARE THE DOCUMENTS REQUIRED FOR DRIVING LICENCE IN DUBAI?


Make sure you have your documentation in order to make the process smoother

Emiratis only require their valid Emirates ID to apply for a Dubai driving course. The Dubai driving licence requirements are different for expats. If you’re a foreigner living in Dubai, you need to submit:

  • Your Emirates ID (copy and original)
  • Your passport with visa page (copy)
  • Passport size photos (at least 8)
  • Your eye test results
  • No Objection Certificate (NOC) from your sponsor*
  • Drivers under 21 should get an NOC from RTA

* The NOC is not required for driving licence in Dubai for 66 professions including managers, doctors and lawyers. Make sure to check with your driving school if your profession falls in the exemption list.

WHAT IS INCLUDED IN THE DRIVING LICENCE TESTS?

There is no easy way to get a driving licence in Dubai. You have to pass a few tests in order to obtain a driving licence in Dubai. Your driving school registers you for the theory test, once you pass all internal tests, specifically the yard parking exam. You can attempt the RTA road test only if you are successful in the RTA theory test. 

With our Dubai driving licence guide, you will know exactly what to expect from these driving exams. Prepare accordingly and thoroughly before you take both these tests and you’ll save yourself a lot of time, money and additional hassle. 

THEORY TEST


Make sure you know all the road signs and you’re well prepared to take the exam

Your theory test will be conducted at one of the authorised driving schools (usually the one you’re registered at). On the day of the test, you should have your

  • Relevant Emirates ID
  • Driving File
  • 2 passport sized photographs
  • The theory test fee

The test entails 35 questions to evaluate your knowledge about road/driving hazards, signal and signs, and safe-driving guidelines. 

The test is divided into three segments. The first segment contains 17 questions. These questions quiz you in various traffic situations. You need to answer at least 11 questions correctly to pass this segment. The second segment comprises 18 questions which focus on driving licence specifics. You need to get 12 of these questions right to be eligible for the final road test. 

The third segment – the Risks Recognition Test – is a series of videos depicting different environmental conditions. The questions in this segment focus on your game plan to tackle with these conditions and their impending risks. 

This test is carried out on a touch-screen computer in English or Arabic. Candidates who aren’t familiar with these languages can opt for the oral exam.

Tips to Pass the RTA Theory Test

  • Thoroughly read and understand the RTA handbook
  • Practice as much as you can on the RTA mobile app
  • Memorise all road and traffic signs
  • Take online mock tests to assess your standing

PARKING TEST

A fully automated test with detailed parking instructions that can be taken at the smart yard of your driving institute. There are five steps in the parking test. These include: 

  • Slope/ hill parking 
  • Emergency brakes
  • Angle Parking (60 degrees)
  • Garage Parking (90 degrees)
  • Parallel Parking 

If you fail the parking test five consecutive times, you will have to take the internal assessment again. 

THE ROAD TEST AND ASSESSMENT


Be attentive, vigilant, responsive and obedient during the RTA road test for a better success story

This is the last and perhaps the most challenging step of your journey to get a driving licence in Dubai. Why? It’s because this is where you prove to the examiner that you are worthy of this driving licence – and you barely get 10 to 12 minutes to do that! 

This is a practical test and you will be driving, so make sure you’re mentally prepared. On your assigned date for the test, reach the RTA driving licence centre Dubai with your: 

  • Relevant Emirates ID
  • Driving File
  • 2 passport sized photographs
  • The road test fee

Wait patiently until your name is called out. Follow the RTA examiner along with the other candidates to the designated car. When your turn comes, drive confidently in a way that demonstrates your overall driving skills.

You’ll get the results of your RTA Dubai driving licence test right after. In case you fail, you need to complete 7 additional classes before you can secure a new date for your road test. If you pass, the examiner will give you the approval paper. Take that and submit it at the Pass Counter with ID Documentation and the Dubai driving licence fee. 

Next, collect your driving file and submit it to the Control Counter. You will be required to pay the licence fee before proceeding to the photo area. Once the photo is taken, you only have to wait a few minutes to get your hard-earned Dubai driving licence. 

Once you have your driving licence, you become eligible to apply for the International Driving Licence (IDL) Dubai. All IDL procedures are dealt by the Automobile and Training Club of UAE (ATCUAE). 

Tips to Pass the RTA Road Test 

  • Dress to impress. You should look and feel like a busy professional.
  • Avoid wearing sunglasses. The examiner checks your eye movements while you drive.
  • Obey the examiner. Don’t argue or question their instructions.
  • Adjust your mirror and seat. Fasten your seat belt and ask others to do it too. 
  • Check the handbrake and get the gear right before you start.
  • Maintain a modest speed within the speed limit and drive confidently.
  • Upon entering the main road, always stop at the STOP sign. Even if the lane is clear, wait for at least 3 seconds.
  • Maintain a safe distance between your car and the one in front of you.
  • Change lanes after checking both the side and rear view mirrors. Check the blind spot before you give an indicator.
  • Wait for at least 3 seconds at the STOP line on a T-Junction and then slowly enter.
  • Avoid applying hard brakes at all costs.
  • Enter a roundabout only when the left side of the road is clear. Always exit with a ‘RIGHT’ indicator.
  • Park the car on the side, just like the examiner asks you to.

WHICH ARE THE RTA APPROVED DRIVING INSTITUTES IN DUBAI?

Driving Test
Your driving school will teach you everything you need to know in order to pass the driving licence test

Here are the 5 driving schools in Dubai endorsed by the RTA. Each school has multiple branches across the city, which offer convenient access to applicants. So, it doesn’t really matter where your located. You’ll always find an RTA approved driving school nearby.  

AL AHLI DRIVING SCHOOL 

  • Contact: +971-4-341-1500 
  • Location: Al Quoz

BELHASA DRIVING CENTER

  • Contact: +971-4-324-3535 
  • Location: Al Wasl

DUBAI DRIVING CENTER

  • Contact: +971-4-345-5855 
  • Location: Al Mina

EMIRATES DRIVING INSTITUTE

  • Contact: +971-4-263-1100 
  • Location: Al Qusais 

GALADARI DRIVING SCHOOL

  • Contact: +971-4-267-6166 
  • Location: Al Qusais

FREQUENTLY ASKED QUESTIONS

WHAT IS THE COST OF OBTAINING A DRIVING LICENCE IN DUBAI?

The Dubai driving license cost may vary between AED 4,500 and AED 7,000 if you manage to pass the final road test in the first attempt. The driving licence cost in Dubai varies depending on the driving institute you choose. If you fail the test, a reattempt would require seven classes of additional practical training before the actual test. You may end up paying an added amount for that. 

WHAT LANGUAGES ARE THEORY CLASSES OFFERED IN?


While language might be a barrier for some, the RTA offers alternative means make driving lessons and classes more accessible

All lectures at RTA approved driving institutes in Dubai offer theory classes in three primary languages: Arabic, Urdu, and English. There are certain institutes that offer additional languages. E-learning options include English and Arabic only. If you cannot take theory lessons in any of the primary languages, you can avail the Remote Interpretation Services (RIS) via Microsoft and Skype translations services, which translates lessons into 195 languages. 

CAN I SWAP MY LICENCE FOR A DUBAI DRIVING LICENCE?

The RTA divides expat applicants into two Dubai driving licence categories: the exempted and the non-exempted countries. People from exempted countries holding a valid driving licence can swap it for a Dubai driving licence. The list includes the following countries:

  • GCC Countries
  • Australia
  • Austria
  • Belgium
  • Canada
  • Denmark
  • Finland
  • France
  • Germany
  • Greece
  • Ireland
  • Italy
  • Japan
  • Netherlands
  • New Zealand
  • Norway
  • Poland
  • Portugal
  • Romania
  • South Africa
  • Spain
  • South Korean
  • Sweden
  • Switzerland
  • Turkey
  • UK
  • USA

If you’re a citizen of the above mentioned countries with a valid driving licence, all you need to do is:

  • Undergo an eye exam
  • Submit the relevant documents
    • Your Emirates ID (copy and original)
    • Your existing licence (copy and original)
    • Your passport with visa page (copy)
    • Passport size photos (at least 8)
    • NOC for driving licence in Dubai from your sponsor
  • Pay the Dubai driving licence fees

Please know that citizens from some of these countries may be required to produce translations or verification letters from their respective consulates.

HOW MANY HOURS OF CLASSES ARE REQUIRED FOR SOMEONE WITH PRIOR DRIVING EXPERIENCE?

Yard Test | Galadari Motor Driving Centre
Even when you are from the exempted countries and know how to drive, you will be subjected to a preliminary evaluation

For expats with prior driving experience belonging to non-exempt countries, the number of classes (practical training: yard and road) would depend on the extent of their experience. Refer to the prerequisite Dubai driving licence details below for further clarity.

EXPERIENCE LEVEL
NUMBER OF HOURS
More than 5 years
Minimum 10 and Maximum 20 hours
2-5 years
Minimum 15 hours and Maximum 30 hours
Less than 2 years
Minimum 20 hours and Maximum 40 hours

These hours should be completed before the applicant appears for the final road test. A pre-evaluation test is conducted for applicants who sign up for a maximum of 30 and 20 hours to evaluate their driving skills. In addition, all applicants need to complete 8 hours of theory classes. 

IS IT POSSIBLE TO TRANSFER MY DRIVING FILE FROM ONE DRIVING INSTITUTE TO ANOTHER?

Yes, it is allowed to transfer your file from one driving institute in Dubai to another. You simply need to request your current institute to make the transfer after settling your dues towards them.

For everyone who successfully obtains a driving licence in Dubai, it is important to keep track of the licence renewal date. Driving with an invalid licence will subject you to heavy fines and penalties. 


Tuesday, June 23, 2020

New To Having A HDMI Cable? on Sony Play station

New To Having A HDMI Cable?


If your new to having a HDMI cable just follow these simple step-by-step instructions to set it up.

1. Leaving your original video & audio cables in, just plug your HDMI cable into your PS3 & TV.
2. A message should appear saying a HDMI cable has been connected, just select yes.
3. If a message does not come up saying a HDMI cable has been connected go to settings - Display settings - Video output & follow the instructions.
----------------------------------------------------------------------


4. If the above method does not work put the PS3 system into recovery mode & select Restart PS3 system. (See above for instructions on how to enter recovery mode)
5. Once the PS3 has turned back on you will see the message saying a HDMI cable has been connected & select yes.


Sony PlayStation 3 fat Yellow Light of Death Repair

Introduction

Use this guide to repair PlayStation 3s with the "Yellow Light of Death" error.

Note: Your PlayStation may look slightly different inside. Be cautious when performing this process on your machine.


Video Overview

  •  
  •  
  1. Use the tip of a spudger to remove the black rubber screw cover from the side of the PS3.
    • Use the tip of a spudger to remove the black rubber screw cover from the side of the PS3.

    • The screw cover may be underneath a warranty sticker. This sticker will change appearance, and show "VOID" after it has been removed.

  2. Remove the single 8.5 mm T10 Security Torx screw from the smart plate.
    • Remove the single 8.5 mm T10 Security Torx screw from the smart plate.

  3. Pull the smart plate toward the hard drive bay, then lift it off the body of the PS3.
    • Pull the smart plate toward the hard drive bay, then lift it off the body of the PS3.

  4. Be sure to keep track of the small metal bracket loosely held in the top cover, if equipped.
    • Be sure to keep track of the small metal bracket loosely held in the top cover, if equipped.

  5. Remove the following seven screws:
    • Remove the following seven screws:

    • Six 52 mm Phillips screws

    • One 30 mm Phillips screw

  6. Lift the top cover from its rear edge and rotate it toward the front of the PS3.
    • Lift the top cover from its rear edge and rotate it toward the front of the PS3.

    • Remove the top cover.

    • There is a plastic hook located in a hole on the top back right hand side corner. Carefully push the plastic hook a bit front the rear of the machine with a spudger to release the rear right of the casing.

  7. Disconnect the Blu-ray power cable from the motherboard.
    • Disconnect the Blu-ray power cable from the motherboard.

    • Pull the connector straight up and out of its socket.

  8. Lift the Blu-ray drive from the edge nearest the power supply and rotate it away from the chassis enough to access its ribbon cable.
    • Lift the Blu-ray drive from the edge nearest the power supply and rotate it away from the chassis enough to access its ribbon cable.

  9. Pull the ribbon cable out of its socket.
    • Use your fingernail to flip up the retaining flap on the Blu-ray ribbon cable socket.

    • Be sure you are prying up on the retaining flap, not the socket itself.

    • Pull the ribbon cable out of its socket.

    • Remove the Blu-ray drive from the PS3.

    • If replacing the Blu-ray drive, transfer the power cable to your new drive.

  10. Pull the control board ribbon cable straight up and out of its socket on the motherboard.
    • Pull the control board ribbon cable straight up and out of its socket on the motherboard.

  11. Remove the two 12 mm Phillips screws securing the control board to the lower case.
    • Remove the two 12 mm Phillips screws securing the control board to the lower case.

    • Remove the control board and its attached cable from the PS3.

  12. Remove the following eight screws securing the motherboard assembly to the lower case:
    • Remove the following eight screws securing the motherboard assembly to the lower case:

    • Seven 12 mm Phillips screws (ph2)

    • One 30 mm Phillips screw

  13. Remove the control board bracket.
    • Remove the control board bracket.

  14. Use the flat end of a spudger to pry the hard drive bay cover away from the lower case.
    • Use the flat end of a spudger to pry the hard drive bay cover away from the lower case.

    • Remove the hard drive bay cover.

  15. Lift the motherboard assembly out of the lower case.
    • Lift the motherboard assembly out of the lower case.

  16. Remove the 7.7 mm Phillips screw securing the ground strap to the chassis.
    • Remove the 7.7 mm Phillips screw securing the ground strap to the chassis.

  17. Pull the AC-In cables slightly away from the rear cover for clearance to access the AC-In connector.
    • Pull the AC-In cables slightly away from the rear cover for clearance to access the AC-In connector.

    • While depressing its locking mechanism, pull the AC-In connector out of its socket on the power supply.

  18. Free Yourself From Outlets

    Improve your laptop battery, improve your life

    Shop Mac Battery Fix Kits
  19. Pull the AC inlet out from the bottom of the rear cover, minding any of its cables that may get caught.
    • Pull the AC inlet out from the bottom of the rear cover, minding any of its cables that may get caught.

  20. While lightly pulling the rear cover away from the logic board assembly, use the flat end of a spudger to release the clips along the top and bottom edges of the rear cover.
    • While lightly pulling the rear cover away from the logic board assembly, use the flat end of a spudger to release the clips along the top and bottom edges of the rear cover.

  21. Remove the rear cover from the logic board assembly.
    • Remove the rear cover from the logic board assembly.

  22. De-route the fan cables from the plastic finger molded into the heat sink.
    • De-route the fan cables from the plastic finger molded into the heat sink.

    • Disconnect the fan from the motherboard.

    • Pull the connector straight up and out of its socket.

  23. Remove the two 9 mm Phillips screws securing the memory card reader to the chassis.
    • Remove the two 9 mm Phillips screws securing the memory card reader to the chassis.

  24. Lift the memory card reader out of the PS3 enough to access its ribbon cable.
    • Lift the memory card reader out of the PS3 enough to access its ribbon cable.

    • Flip up the retaining flap on the memory card reader ribbon cable socket.

    • Be sure you are prying up on the retaining flap, not the socket itself.

    • Pull the ribbon cable out of its socket and remove the memory card reader.

  25. Disconnect the DC-In cables from the front of the heat sink.
    • Disconnect the DC-In cables from the front of the heat sink.

    • Pull the connector toward the front of the PS3.

  26. Remove the five 9 mm Phillips screws securing the power supply to the chassis.
    • Remove the five 9 mm Phillips screws securing the power supply to the chassis.

  27. Lift the power supply by its front edge to clear the two posts attached to the motherboard.
    • Lift the power supply by its front edge to clear the two posts attached to the motherboard.

    • Remove the power supply.

  28. Remove the four 16.5 mm shouldered Phillips screws securing the heat sink to the motherboard.
    • Remove the four 16.5 mm shouldered Phillips screws securing the heat sink to the motherboard.

    • Remove the two brackets held under the screws you just removed.

  29. Lift the motherboard assembly off the heat sink.
    • Lift the motherboard assembly off the heat sink.

    • The heat sink may still be held in place by the thermal paste. If this is the case, gently pry the heat sink away from the motherboard housing. Make sure to not bend the copper piping on the heat sink.

    • Be sure to apply a new layer of thermal paste when reattaching the heat sink.

    • Never applied thermal paste before? Our thermal paste guide makes it easy.

    • If you're following the YLOD repair guide, stay tuned for where to apply the replacement thermal paste.

  30. Flip up the retaining flap on the Blu-ray ribbon cable socket.
    • Flip up the retaining flap on the Blu-ray ribbon cable socket.

    • Be sure you are prying up on the retaining flap, not the socket itself.

    • Remove the Blu-ray ribbon cable.

  31. Flip up the flap on the memory card reader ribbon cable socket and remove the ribbon cable.
    • Flip up the flap on the memory card reader ribbon cable socket and remove the ribbon cable.

  32. Flip up the retaining flap on the Wi-Fi/Bluetooth ribbon cable socket.
    • Flip up the retaining flap on the Wi-Fi/Bluetooth ribbon cable socket.

    • Pull the Wi-Fi/Bluetooth ribbon cable out of its socket.

  33. Disconnect the DC-In cable from the motherboard and set it aside.
    • Disconnect the DC-In cable from the motherboard and set it aside.

    • Pull the connector straight up and out of its socket on the motherboard.

  34. Disconnect the PRAM battery from the motherboard.
    • Disconnect the PRAM battery from the motherboard.

    • The PRAM socket is delicate and has the potential to break off the motherboard. If possible, hold down the socket as you disconnect the PRAM battery cable.

  35. Rotate the PRAM battery slightly counter-clockwise and remove it from the motherboard assembly.
    • Rotate the PRAM battery slightly counter-clockwise and remove it from the motherboard assembly.

  36. Remove the blue 8 mm Phillips screw securing the hard drive cage to the chassis.
    • Remove the blue 8 mm Phillips screw securing the hard drive cage to the chassis.

  37. Push the hard drive cage toward the front of the motherboard assembly.
    • Push the hard drive cage toward the front of the motherboard assembly.

    • Remove the hard drive from the motherboard assembly.

  38. Remove the two 3.7 mm #0 Phillips screws securing the chassis to the hard drive socket.
    • Remove the two 3.7 mm #0 Phillips screws securing the chassis to the hard drive socket.

  39. Remove the two 8.3 mm #0 Phillips screws securing the two halves of the motherboard together.
    • Remove the two 8.3 mm #0 Phillips screws securing the two halves of the motherboard together.

  40. Carefully feed the Wi-Fi/Bluetooth ribbon cable through the hole in the top motherboard cover.
    • Carefully feed the Wi-Fi/Bluetooth ribbon cable through the hole in the top motherboard cover.

    • Remove the top motherboard cover.

  41. Remove the motherboard from the bottom motherboard cover.
    • Remove the motherboard from the bottom motherboard cover.

  42. Flip up the retaining flap on the Wi-Fi/Bluetooth ribbon cable socket.
    • Flip up the retaining flap on the Wi-Fi/Bluetooth ribbon cable socket.

    • Remove the Wi-Fi/Bluetooth ribbon cable from the motherboard.

    • Motherboard remains.

    • Using the flat end of the spudger, remove the old thermal paste off the CPU and GPU on the motherboard.

    • Using a cleaner such as Arctic Silver's ArctiClean or high alcohol content rubbing alcohol, clean the CPU and GPU.

    • Clean the thermal paste off of the heat sink in the same way.

  43. Using your fingers or the flat end of a spudger, remove the old thermal pads on the logic board as indicated:
    • Using your fingers or the flat end of a spudger, remove the old thermal pads on the logic board as indicated:

    • Large square thermal pads

    • Small square thermal pads

    • Small rectangular thermal pads (located on the underside of the board, as highlighted in the second picture)

    • Some of the smaller thermal pads may be attached to the metal casing that surrounds the motherboard rather than the motherboard itself.

  44. Set the heat gun to "Low", and let it run for a few seconds to reach operating temperature.
    • Set the heat gun to "Low", and let it run for a few seconds to reach operating temperature.

    • Holding the motherboard upright, warm up the entire board with the heat gun. The board should be warm, but not too hot.

    • This will prevent damage to the board caused by localized thermal expansion.

  45. Set the motherboard on a support so that the CPU and GPU are completely supported and level.
    • Set the motherboard on a support so that the CPU and GPU are completely supported and level.

    • The support should be something that can resist temperatures upwards of 300 degrees Celsius. Suggestions: scrap lumber, old books, cardboard box.

    • In the next few steps, you will be reflowing the solder under the chips marked in red.

    • Once you begin reflowing the chips, do not touch or move the motherboard until it is completely cool. Doing so can render the motherboard irreparably damaged.

  46. Using a circular motion, evenly heat (using low heat) each of the four areas for roughly 25 seconds each.
    • Using a circular motion, evenly heat (using low heat) each of the four areas for roughly 25 seconds each.

    • Begin heating the GPU, marked "RSX", and heat the chips in a zig-zag order.

  47. Continue heating the chips using the same circular motion as described above, for about 25 seconds each.
    • Continue heating the chips using the same circular motion as described above, for about 25 seconds each.

  48. Ensure that the motherboard has completely cooled before continuing this guide.
    • Ensure that the motherboard has completely cooled before continuing this guide.

    • If you have not applied thermal paste before you can check our thermal paste guide whilst it is cooling.

    • Apply a thin bead of thermal paste on the CPU.

    • Using the thermal paste spreader card, spread the paste out thinly and evenly on the chip.

    • In the same way, apply a thin layer of thermal paste on the GPU.

    • Clean up any excess thermal paste off the motherboard.

  49. Apply the fresh thermal pads to the motherboard in the locations indicated:
    • Apply the fresh thermal pads to the motherboard in the locations indicated:

    • Large square pads

    • Small square pads

    • Small Rectangular Pads

    • If you'd like to cut your own thermal pads, you'll need material about 2-2.5mm in thickness. Thanks to user howardsarah34 for the exact measurements for the thermal pads.

    • Two 3cm x 3cm Squares

    • Ten 1cm x 1cm Squares

    • Five 1.5cm x 0.5cm rectangles

  50. Peel the remaining white plastic cover off the other side of thermal pads.
    • Peel the remaining white plastic cover off the other side of thermal pads.